
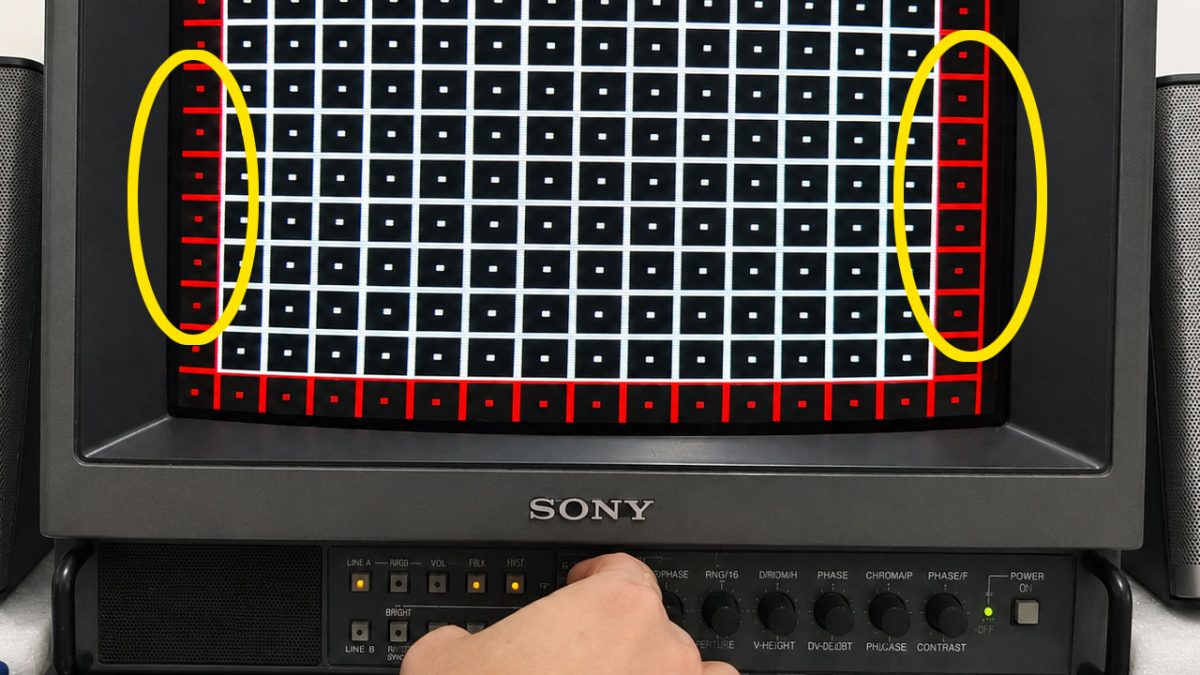
The picture on my Sony PVM 14M2E was slightly off-center horizontally. It was not a major geometry problem, but once I noticed that the image had shifted to one side, it became difficult to ignore.
Fortunately, I was able to correct it through the PVM’s service menu without opening the monitor or physically adjusting any internal components.
Watch the Video
The complete process, including the test-grid comparison and service-menu adjustment, can be seen in my video:
My Sony PVM Picture Was Off-Center—Here’s the Fix

Identifying the Problem
I used the grid pattern in the 240p Test Suite to evaluate the screen alignment.
A test grid makes horizontal positioning problems much easier to see because you can compare the visible area on the left and right sides of the screen. In my case, the picture clearly needed to be moved slightly to the right.
Before adjusting anything, it is a good idea to photograph or write down the original values. Service-menu settings can significantly affect the image, and having the original numbers makes it easier to undo an unwanted change.
Entering the Sony PVM Service Menu
On my Sony PVM, I entered the service menu using the following process:
- Press the MENU button.
- Press ENTER and DEGAUSS together.
- Navigate to the video-phase adjustment section.
The exact menu structure may differ between Sony PVM models, so this procedure should not automatically be assumed to work identically on every monitor.
Adjusting the Horizontal Position
Because I was calibrating a 60 Hz signal, I selected the Video Phase 60 Hz setting.
I then changed the horizontal phase value gradually while keeping the 240p Test Suite grid visible. Small adjustments were enough to move the entire picture and balance the visible area on both sides of the screen.
Avoid making a large change immediately. Increase or decrease the value one step at a time and watch how the grid moves.
Saving the New Setting
After centering the picture, I pressed the DEGAUSS button twice to save the adjustment.
I then checked the grid again to confirm that the new position had been retained and that the picture looked properly centered during normal gameplay.
Horizontal Position Is Not the Same as Horizontal Size
This adjustment moves the complete image left or right. It does not stretch or compress the picture.
If the picture is centered but too wide or too narrow, that is a horizontal-size issue and requires a different setting. Changing the wrong value can create additional geometry problems, so it is important to identify the actual issue before making adjustments.
Final Result
The adjustment was simple, but it made the PVM look noticeably better. The image is now properly centered, and the borders appear much more balanced.
For anyone using a Sony PVM for retro gaming, the 240p Test Suite is extremely useful for identifying alignment, overscan and geometry issues that may be difficult to notice during regular gameplay.
Always record the original service-menu values, change only one setting at a time and avoid adjusting options you do not understand.